Dr Francisco Pérez Jiménez

Dr Francisco Pérez Jiménez

viernes, 31 de enero de 2014

Femoroacetabular impingement an arthroscopic solution

http://www.bjj.boneandjoint.org.uk/content/95-B/11_Supple_A/26.abstract


Femoroacetabular impingement

an arthroscopic solution

  1. F. S. Haddad, BSc, MD(Res), MCh(Orth), FRCS(Orth), FFSEM, Consultant Orthopaedic Surgeon1 Author Profile
+Author Affiliations
  1. 1University College Hospital, Department of Trauma & Orthopaedic Surgery, 235 Euston Road, London NW1 2BU, UK.
  1. Correspondence should be sent to Professor F. S. Haddad; e-mail:fsh@fareshaddad.net

Abstract

Young adults with hip pain secondary to femoroacetabular impingement (FAI) are rapidly being recognised as an important cohort of orthopaedic patients. Interest in FAI has intensified over the last decade since its recognition as a precursor to arthritis of the hip and the number of publications related to the topic has increased exponentially in the last decade. Although not all patients with abnormal hip morphology develop osteoarthritis (OA), those with FAI-related joint damage rapidly develop premature OA. There are no explicit diagnostic criteria or definitive indications for surgical intervention in FAI. Surgery for symptomatic FAI appears to be most effective in younger individuals who have not yet developed irreversible OA. The difficulty in predicting prognosis in FAI means that avoiding unnecessary surgery in asymptomatic individuals, while undertaking intervention in those that are likely to develop premature OA poses a considerable dilemma. FAI treatment in the past has focused on open procedures that carry a potential risk of complications.
Recent developments in hip arthroscopy have facilitated a minimally invasive approach to the management of FAI with few complications in expert hands. Acetabular labral preservation and repair appears to provide superior results when compared with debridement alone. Arthroscopic correction of structural abnormalities is increasingly becoming the standard treatment for FAI, however there is a paucity of high-level evidence comparing open and arthroscopic techniques in patients with similar FAI morphology and degree of associated articular cartilage damage. Further research is needed to develop an understanding of the natural course of FAI, the definitive indications for surgery and the long-term outcomes.
Cite this article: Bone Joint J 2013;95-B, Supple A:26–30.

Footnotes

  • No benefits in any form have been received or will be received from a commercial party related directly or indirectly to the subject of this article.
    This paper is based on a study which was presented at the 29th Annual Winter 2012 Current Concepts in Joint Replacement® meeting held in Orlando, Florida, 12th – 15th December.
  • Received September 1, 2013.
  • Accepted September 2, 2013.

miércoles, 29 de enero de 2014

Rotura del ligamento cruzado anterior

http://dfisioterapia.com/2014/01/26/rotura-del-ligamento-cruzado-anterior-causas-sintomas-tratamientos/


Rotura del ligamento cruzado anterior 

Rotura del ligamento cruzado anterior: causas, síntomas, tratamientos
El ligamento cruzado anterior (LCA) es una estructura anatómica de fibras colágenas que discurre entre el fémur y la tibia en sentido oblicuo.
La inserción del LCA se sitúa en el área prespinal de la cara superior de la tibia y su origen en la porción postero-interna del cóndilo femoral externo.
Sus principales funciones son las de controlar el desplazamiento anterior de la tibia respecto al fémur tanto en flexión como en extensión, impedir la hiperextensión y limitar la rotación interna.
Anatomía de la rodilla y rotura del ligamento cruzado anterior
La lesión del LCA, se puede considerar como una de los diagnósticos más mencionados al año. Los deseos de hábitos de vida saludable, en los que se realiza actividades deportivas agresivas y además se pretende tener grandes resultados, se considera como principal factor que contribuye a la lesión.
Los gestos característicos que se dan cuando se produce la lesión, ya sea por traumatismo externo o bien por un propio gesto, son:
  • Hiperextensión con rotura meniscal. En casos muy violentos puede verse lesionado el ligamento cruzado posterior (LCP). Un claro ejemplo es cuando un jugador da un “Chut” al aire.
  • Valgo-flexión-rotación externa, donde además se ve afectado el ligamento lateral interno y los meniscos.
  • Varo-flexión-rotación interna, además de tener la posibilidad de lesión del ligamento lateral externo. Este mecanismo suele ser menos común.
  • Traumatismo anteroposterior o viceversa, donde el LCP puede verse afectado.
  • Cambio de dirección con el pie de apoyo en el suelo y solicitando una contracción del cuádriceps. Esto ocurre cuando una rodilla está en carga y se asocia una rotación interna, tendiéndose a subluxar la tibia hacia anterior.

Síntomas 

En ciertas ocasiones, cuando la lesión es leve, se aprecia una inestabilidad en la rodilla.
  • Dolor: puede ser de tipo intenso y perdurar en el tiempo por el edema o lesión ósea, pero puede desaparecer al realizar un intento de reincorporación en la actividad.
  • Crujido: en el momento de la lesión se escucha un crujido o sensación de desgarro.
  • Hemartrosis: aunque este sea uno de los principales síntomas, no quiere decir que en aquellos casos en los que no se da la sangre roja y abundante, no haya una rotura del ligamento.
  • Fallo articular: “la rodilla se me va”.
  • Impotencia funcional: con una limitación de movimiento.

Valoración 

Para realizar la exploración física, debemos tener en consideración la recogida de datos clínicos y seguir un orden lógico, siendo primero la maniobra de Lachman, valoración de los cajones “anterior y posterior”, y pruebas dinámicas específicas.
Maniobra de Lachman
  • Maniobra de Lachman: en 1976 Torg y cols describen la maniobra de traslación de la tibia hacia delante, con la rodilla cercana a la extensión, siendo positiva si la tibia se desplaza hacia delante. Desde entonces decide darle el nombre del su maestro, llamandose “maniobra de Lachman”. Sin embargo, el especialista Noulis describió en el Congreso de Toronto una serie de aportaciones para la exploración de los ligamentos cruzados.
  • Cajón anterior: con la rodilla a 70º-90º de flexión y el pie en rotación externa de 15º. Se debe
    Test de Cajón Anterior
    tener en consideración, que si no se produce el desplazamiento anterior de la tibia respecto al fémur en esta prueba, puede deberse al tope que genera el cuerno posterior del menisco interno sano, aunque se el LCA la estructura anatómica más importante que limita la anterioridad de la tibia.
  • Pruebas diadinámicas específicas:
    • Pivot Shift: rodilla en extensión, efectuamos una rotación interna de la pierna y a la vez damos un valgo a la altura de la cabeza del peroné.Seguidamente flexionamos la rodilla y a los 30º-40º la rodilla tenderá a subluxarse si es positivo
    • Prueba del cajón en rotación flexión: decúbito supino y la rodilla en extensión, se eleva la pierna hacia arriba, dejando que el fémur caiga hacia atrás y rote externamente. Cuando se flexiona la rodilla, la tibia se empuja hacia atrás y el fémur realiza rotación interna.

Tratamiento quirúrgico 

Ligamento cruzado anterior
Tras el accidente, se suele producir una artrofibrosis “rigidez articular” que con el paso del tiempo se recupera la movilidad, teniendo como objetivo principal lograr una correcta extensión. Es por ello, por lo que en ocasiones se pospone la cirugía.
Cada vez son mayores las reparaciones quirúrgicas mediante artroscopia. Se realizan aloinjertos a partir del tendón de la pata de ganso o bien del tendón rotuliano “técnica H-T-H (hueso-tendón-hueso)”.
La colocación de los implantes en la tibia se sitúa, en un tunel tibial a la altura proximal teniendo como referencia la tuberosidad tibial, y en el fémur se realiza el tunel femoral a la altura del cóndilo femoral externo.

Tratamiento fisioterapéutico 

El tratamiento fisioterapéutico debe ser individualizado en cada uno de los pacientes con esta patología, aunque las líneas sean de carácter general. Se deben tener en cuenta, factores como la edad, el nivel de actividad, motivación del paciente, previsiones de cumplir un programa rehabilitador riguroso, estado de las zonas articulares.
  • Rehabilitación Pre-operatoria 

    Primera fase 
    Tendremos como principales objetivos en una:
    • Mejorar el rango articular
    • Controlar el dolor y la inflamación, con estimulación eléctrica, crioterapia.
    Fase media de rehabilitación Pre-operatoria 
    • Mejorar el rango articular
    • Mejorar la fuerza del tronco, cadera, rodilla y tobillo
    • Fortalecimiento muscular y propioceptivo
    • Ejercicios en cadena cinética abierta – cadena cinética cerrada
    Fase final de rehabilitación Pre-operatoria 
    • Normalizar la marcha
    • Disminuir la rigidez postoperatoria
    • Preparación del paciente mentalmente y físicamente para la rehabilitación
Consejos que debe seguir el paciente en su domicilio:
  • Realizar los ejercicios oportunos que le mande el fisioterapeuta como realizar flexo-extensión de la rodilla, colocar hielo tras los ejercicios, contracciones de cuádriceps, favorecer la extensión de rodilla.

Bibliografía 

  1. Concejero López, V. Herrador Munilla, M.A. Garrido González, J.I. Ligamento cruzado anterior. Concejero López, V. Madrigal, J.M. Traumatología de la rodilla. 1ª Ed. Madrid: Médica Panamericana; 2002. p. 149-189
  2. Forriol, F. Maestro, A. Vaquero Martín, J. El ligamento cruzado anterior: morfología y función. Traumatología Fund MAPFRE. 2008. Vol 19 Suple 1. p. 7-18
  3. Pässler, H.H. The history of the cruciate ligaments: some forgotten (or unknown) facts from Europe. Knee Surg. Sports Traumatol. Arthroscopy.1993. 1: 13-16
  4. Rafael F. Escamilla. Toran D. MacLeod. Kevin E. Wilk. ACL Strain and Tensile Forces for Weight Bearing and Non-Weight-Bearing Exercises After ACL Reconstruction: A Guide to Exercise Selection. Journal of Orthopaedic & Sports Physical Therapy. 2012. Vol 42 (3). P. 208-220
Imágenes
  1. www.adam.com

martes, 28 de enero de 2014

Your Top Ten Bone and Joint Health Resolutions in 2014

http://newsroom.aaos.org/media-resources/Press-releases/top-ten-bone-and-joint-health-resolutions.htm

January 02, 2014

Your Top Ten Bone and Joint Health Resolutions in 2014

Pledge to ask questions, modify behaviors and Get Up! Get Out! and Get Moving!

Rosemont, Ill.– Orthopaedic surgeons understand bone and joint health problems are among the most prevalent and debilitating health challenges Americans face. This New Year, the members of the American Academy of Orthopaedic Surgeons(AAOS) would like to empower you to do your part to ensure a more healthy and active self: pledge to make the Ten Bone and Joint Health Resolutions part of your lifestyle.  A message from the AAOS, whose members would rather prevent, than treat injuries in the first place.
 
#10: Always cut away from yourself in the kitchen
One slip of the knife can cause a terrible injury. When cutting fruits and vegetables (and especially avocados!), be sure to cut away from your body and keep your free hand away from the blade. Keep your knife handles dry, your cutting surface secure, and your cutting area well-lit. 
 
#9: Warm up before sporting activities
A good warm up prepares your body for more intense activity by getting your blood flowing, raising muscle temperature, and increasing your breathing rate. Warming up gives your body time to adjust to the demands of exercise. This can improve your performance and help you get the results you want. How long you warm up depends on your fitness level, but if you are new to exercise, your body will respond better with a longer warm up.
 
#8:  Check your Vitamin D levels and start supplementation if warranted
Vitamin D is necessary for strong bones and muscles. Without Vitamin D, our bodies cannot effectively absorb calcium, which is essential to good bone health. Recent research supports that the body needs at least 1000 IU per day from diet and/or sunlight for good health. A simple blood test can reveal your Vitamin D level.
 
#7:  Keep your bones strong with weight-bearing activities
Everyone needs lifelong weight-bearing exerciseto build and maintain healthy bones. Consider any of the following weight-bearing activities each day: brisk walking, jogging and hiking; yard work such as pushing a lawnmower and heavy gardening; team sports such as soccer, baseball and basketball; dancing, step aerobics and climbing; tennis and other racquet sports; skiing, skating, karate and bowling; weight training with free weights or machine.
 
#6: Stay off ladders
They are dangerous! If you must use one to reach something on the top shelf of the pantry, to wash windows or clean the gutters, follow AAOS ladder safety guidelines: inspect the ladder for any loose screws, hinges or rungs; never place a ladder on the ground or flooring that is uneven; make sure the soles of your shoes are clean so they don’t slip off the ladder rung; never stand on the top rung of any ladder and always grip the rails of the ladder while climbing. Learn more about ladder safety
 
#5: Be aware of the loads you carry and how you carry them
If possible, lighten the load you carry each day, because the larger and heavier your backpack, luggage, purse, or diaper bag, the greater at risk you are for neck, back and shoulder injuries. When lifting a large item, stand alongside it and bend at the knees. Try and limit bending at the waist. Lift luggage with your leg muscles and don’t twist when lifting or carrying. Point your toes in the direction you are headed and turn your entire body in that direction.  If you are carrying a backpack, use both straps to help distribute the weight. 
 
#4: Protect your joints and learn how they can last a lifetime
Thirty minutes of physical activity a day can help individuals feel good and prevent certain medical conditions, so Get Up! Get Out! and Get Moving! Exercise helps keep the joints flexible, the muscles around the joints strong, bone and cartilage tissues healthy and reduces pain and stiffness. If you do have joint pain or arthritis, find an orthopaedic surgeonin your area and discuss your options on how best to preserve your joint.
 
#3: Eliminate hazards in your home and the homes of your elderly relatives that might cause a fall
Falls are the leading cause of both fatal and nonfatal injuries among elderly adults and in 2010, more than 2.3 million Americans were treated in emergency rooms for fall-related injuries.  Research shows that simple safety modifications at home, where most falls occur, can substantially cut the risk of falls and related injuries. Fall-proof your home by placing a slip-resistant rug or rubber mat adjacent to the bathtub for safe entry and exit or installing handrails on both sides of the stairway. Other fall prevention tips available at OrthoInfo.org.
 
#2: Decide to Drive: Keep your Eyes on the Road and Hands on the Wheel
Every day, orthopaedic surgeons see the horrible consequences of people who choose to drive while distracted. So, each time you get behind the wheel, make a conscious decision to ‘Decide to Drive.’ Prepare to drive before you start your car–adjust all controls, mirrors, maps, navigation systems, etc., while still in park. If a distraction comes up while driving, pull over and manage it. But most importantly, keep your eyes on the road and hands on the wheel every time you drive. 
 
#1: Take an active part in your own healthcare and be an informed patient
Better healthcare happens when patients and physicians work together as a team. It’s all about communicating. So remember to write down your questions before your appointment. And, insist on fully understanding all treatment options discussed, so together you can make the best decisions. Don’t ever hesitate to ask questions, voice concerns or speak up when you don’t understand. Always be honest and answer questions completely; share your point of view and don’t hold back information. Read more patient-physician communication tips here.  
 
For other tips and information on bone and joint health, visit OrthoInfo.org.

lunes, 27 de enero de 2014

Ankle Arthroscopy


http://www.aofas.org/footcaremd/treatments/Pages/Ankle-Arthroscopy.aspx

Ankle Arthroscopy 

What is ankle arthroscopy?   ;

Ankle arthroscopy is a minimally invasive surgical procedure that orthopaedic surgeons use to treat problems in the ankle
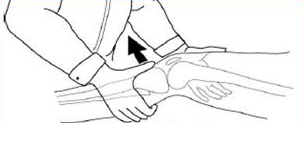
Set-up for anterior ankle arthroscopy
 joint. Ankle arthroscopy uses a thin fiber-optic camera (arthroscope) that can magnify and transmit images of the ankle to a video screen.

What are the goals of ankle arthroscopy?

The goals of surgery are to reduce ankle pain and improve overall function.

What is arthroscopy used for?

Arthroscopy can be used to diagnose and treat different disorders of the ankle joint. The list of problems that can be treated with this technology is constantly evolving and includes:
Ankle arthritis: Ankle fusion is a treatment option appropriate for many patients with end-stage ankle arthritis. Ankle arthroscopy offers a minimally invasive way to perform ankle fusion. Results can be equal to or better than open techniques.
Ankle fractures: Ankle arthroscopy may be used along with open techniques of fracture repair. This can help to ensure normal alignment of bone and cartilage.It may also be used during ankle fracture repair to look for cartilage injuries inside the ankle.
Ankle instability: Ligaments of the ankle can become stretched out, which can lead to a feeling that the ankle gives way. These ligaments can be tightened with surgery.  Arthroscopic techniques may be an option for this problem.
Anterior ankle impingement (also referred to as athlete’s ankle or footballer’s ankle): Ankle impingement occurs when bone or soft tissue at the front of the ankle joint becomes inflamed. Symptoms include ankle pain and swelling. This can limit the
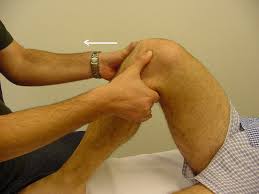
Arthroscopic view of the ankle showing anterolateral impingement
ability to bend the ankle up. Walking uphill is often painful. Osteophytes (bone spurs) can be seen on X-ray. Arthroscopy can be used to shave away inflamed tissues and bone spurs.
Arthrofibrosis: Scar tissue can form within the ankle. This can lead to a painful and stiff joint. This is known as arthrofibrosis. Ankle arthroscopy can be used to identify the scar tissue and remove it.
Infection: Infection the joint space cannot be treated with antibiotics alone. It often requires an urgent surgery to wash out the joint. This can be done with arthroscopy.
Loose bodies: Cartilage, bone and scar tissue can become free floating in the joint and form what is referred to as loose bodies. Loose bodies can be painful and can cause problems such as clicking and catching. Locking of the ankle joint may occur. Ankle arthroscopy can be used to find and remove the loose bodies.
Osteochondral defect (OCD): These are areas of damaged cartilage and bone in the ankle joint. OCDs are usually caused by injuries to the ankle such as fractures and sprains. Common symptoms include ankle pain and swelling.Patients may complain of catching or clicking in the ankle. The diagnosis is made with a combination of a physical exam and imaging studies. Imaging may include X-rays, MRI or CT scan. The treatment is based on the size, location and stability of the OCD. The patient’s symptoms and activity demands are also considered. Surgery often consists of scraping away the damaged cartilage and drilling small holes in the bone to promote healing. Bone grafting and cartilage transplant procedures can also be performed.
Posterior ankle impingement: This occurs when the soft tissue at the back of the ankle becomes inflamed. Pointing the foot down can be painful. This overuse syndrome occurs commonly in dancers. It can be associated with an extra bone called an

Lateral radiograph showing an os trigonum in the posterior ankle 
os trigonum. The problem tissue can be removed with arthroscopy. 
Synovitis: The soft tissue lining of the ankle joint (synovial tissue) can become inflamed.  This causes pain and swelling. It can be caused by injury and overuse. Inflammatory arthritis (rheumatoid arthritis) and osteoarthritis can also cause synovitis. Ankle arthroscopy can be used to surgically remove inflamed tissue that does not respond to nonsurgical treatment.
Unexplained ankle symptoms: Occasionally patients develop symptoms that cannot be explained by other diagnostic techniques.  Arthroscopy provides the opportunity to look directly into the joint. The surgeon can then identify problems that may be treated with surgery.

When should I avoid ankle arthroscopy?

Elective arthroscopy is not appropriate for some patients. Patients with severe ankle arthritis may not benefit from arthroscopic “clean up” surgery. Patients with active infections or other medical problems may also not be appropriate surgical candidates.

General Details of Procedure 

The surgeon marks the operative leg prior to surgery. The patient is transported to the operating room and given anesthesia.  A tourniquet is commonly applied to the leg. The leg is thoroughly cleaned. The surgeon will sometimes use a device to “stretch” the ankle joint and make it easier to see.
At least two small incisions are made in the front and/or back of the ankle.These “portals” become the entry sites into the ankle for the arthroscopic camera and instruments. Sterile fluid flows into the joint to expand it and allow better visualization. The camera and instruments can be exchanged between portals to perform the surgery. After the surgery is complete, sutures are placed to close the portals. A sterile dressing is placed over the sutures. A splint or boot is often used.

What happens after the procedure?

You can expect some pain and swelling following surgery. The leg may need to be kept elevated. You may need to take oral pain medication for several days.You may be able to walk on the leg immediately, or you may need to wait several months before putting weight on the leg. This will depend on the type of surgery performed and the recommendations of your surgeon. If needed, sutures are removed one to two weeks after surgery. Your surgeon will determine when activities such as range of motion and ankle exercises are allowed. Physical therapy may also be used.

Potential Complications 

There are complications that can occur with any surgery. These include the risks associated with anesthesia, infection, and bleeding or blood clots.
Potential complications specific to ankle arthroscopy include injury to nerves and blood vessels around the ankle. Numbness or tingling at the top of the foot can occur approximately 10 percent of the time. This typically resolves over time.

Frequently Asked Questions 

When can I safely return to driving?
When you are able to bear weight without limitation and are no longer taking narcotic pain medication you will likely be cleared to return to driving.
When can I expect to return to work and sports?
You may be able to return work several days after surgery if you can safely complete your job duties. Most patients can expect to be out of work for at least one to two weeks. It is possible to return to high-level sports following ankle arthroscopy, but expect at least four to six weeks of recovery before getting back to such activities.
What are the outcomes of ankle arthroscopy?
Seventy to 90 percent of patients undergoing ankle arthroscopy for the most common problems achieve good or excellent results.
What are the advantages of ankle arthroscopy?
Ankle arthroscopy allows the surgeon to see inside the ankle with small incisions. This minimizes problems sometimes encountered with large incisions, such as infection and pain. The procedure can be performed as an outpatient because of its minimally invasive nature. Patients may be able to begin rehabilitation sooner, and they may be able to return to high-level activities such as sports more quickly.
The American Orthopaedic Foot & Ankle Society (AOFAS) offers information on this site as an educational service. The content of FootCareMD, including text, images and graphics, is for informational purposes only. The content is not intended to substitute for professional medical advice, diagnoses or treatments.If you need medical advice, use the "Find an Orthopaedic Foot & Ankle Surgeon" tool at the top of this page or contact your primary doctor.